Creating custom application templates
Hi all,
In this blog we will cover the creation of custom application templates, which have some advantages next to the default ones already available in Blender. You may want to work in a completely different setup, but don’t want to mess up your default templates. Or have a custom layout and addon set for e.g. sculpting. Or you want a studio wide template for everybody to use.
It’s a tad long, so we will discuss the following:
– copying the default startup scene and preferences file into a new folder with an appropriate name,
– zip this into a file and install the new template,
– work with this template, or tweak the different settings,
– when you tweaked & re-save the preferences and/or startup scene, you’ll need to copy the newly created files back into the custom template folder,
– In addition, you can add a custom splash screen or startup script to the mix,
– Done! For now… 😉
– Enjoy your custom workspace 😉
What are application templates?
When we take a quick look at the blender manual, we can see that Application Templates are a set of startup settings for Blender, and they can define the:
– layout of the UI
– the theme color
– keymaps
– activated addons
– viewport lighting etc. on startup.
Blender already has 5 templates available to us, which we can find under the ‘File > New menu..’
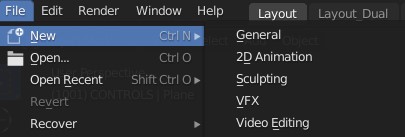
file menu templates
The ‘General‘ template is the default we see on startup, but you can easily switch to one of the other templates and see your UI layout and workspaces at the top change.
The application templates work in combination with your user preferences, and the 5 default templates in blender all work with the -same- set of user preferences. If we change for instance the theme colors, the new colors in the UI will transfer over to every template we open. This is also the case for your activated addons, keymaps etc.
But with custom templates we can change that behavior, and create different preference settings or startup scenes.
How do we create our own templates?
As you probably already know, is that you can easily change the behavior of your default startup scene. Anything you change or add inside the startup scene can be saved via the File>Default>Save startup file command. These changes could be UI layout changes, viewport lighting, added objects and materials, a background lighting setup etc. The next time you start blender and open up your ‘General‘ template, you will see your user changes return.
In combination with a set of changed preferences this could be the basis for your our own template.
Basic steps:
To create the simplest application template possible, we just need the blendfile with the name ‘startup.blend’ from the user preferences.
But we want to be able to change the preferences as well, so we need a ‘userpref.blend‘ preferences file as well.
But where does blender look for all this, so we can add our files?
The manual shows us this for Windows users: %USERPROFILE%\AppData\Roaming\Blender Foundation\Blender\2.81\, where the %USERPROFILE% variable equals to the ‘C:\Users\’ folder.
The most basic way to start with creating a custom template is to copy the existing files from the user preferences into a newly created folder with an appropriate name. Let’s say ‘blenderbrew‘. 😉
So this folder now contains the startup.blend and userpref.blend file. We have to zip this folder to be able to install it as a custom template.
Note: The name of the zipfile can be different from the foldername, as Blender will show the foldername in the menu after installation.
installation and file location
Templates cannot be installed within the preferences menu, but have to be installed via the blender icon in the top left corner of the UI.
Maybe one day this option will also move to the preferences, who knows…
But in the dropdown menu we can see the ‘ install template‘ option, Browse to the zipped template and install it. Your newly created template will now be immediately available in the ‘File > New..’ menu at the bottom of the templates list.
The new templates will even show up in the list of templates you see beneath the splash screen when you start blender.
So where did the files get installed?
– The user files are stored in the ‘config‘ folder,
– Your addons are installed in the ‘scripts/addons‘ folder,
– And our newly created template are installed in the ‘scripts/startup/bl_app_templates_user‘ folder.
Note: This folder is created when you install a custom template and isn’t there by default.
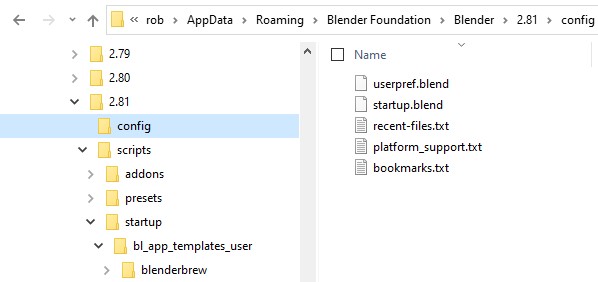
user folders
custom splashscreen
But there are some other things we can do with this. Fancy your own studio startup screen? We can do that too, but it requires some extra tweaking to our template files and the shortcut which starts blender.
If we have a look at the manual again, we need to add two images called splash.png (501x282px) and splash_x2.png (1002x564px) into our template folder. Now we know where our template folder can be found, we can easily create our custom splash screens and copy both into the template folder.
The custom splashscreen will only be availabe if we can start Blender with our newly created custom template.
So we have to force Blender into it, and it’s easily done by tweaking the program shortcut.
If we open up the properties of our shortcut, we can add the template to the Target line:
“\blender.exe” –app-template templatename
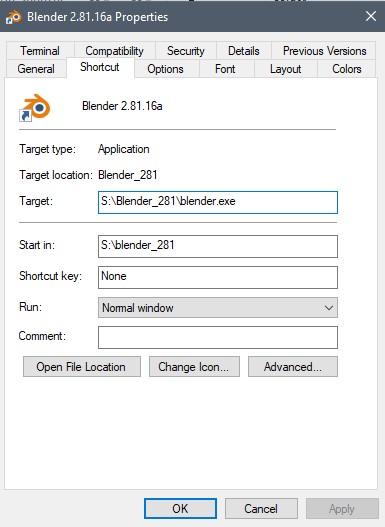
shortcut properties panel
In our case the template name is blenderbrew. If you want, you can even add a custom icon to the shortcut, so you know this shortcut will run a custom template.
Press OK to save the changes and close the window. Now.…restart blender with your custom shortcut, and see you handy work appear in the splashscreen and UI.
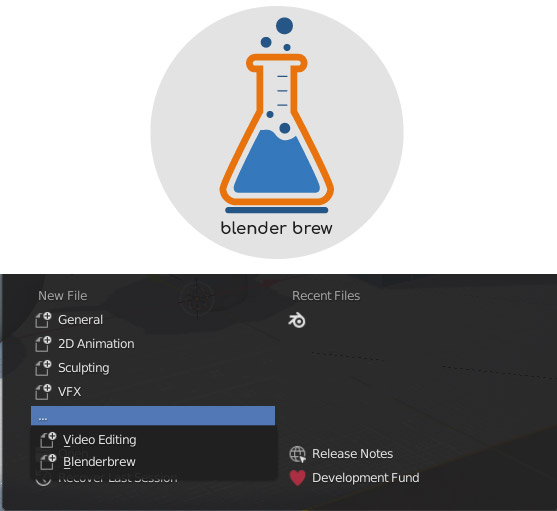
custom splash screen with additional template showing
Note: For now, there seems to be a small bug relating custom templates running a script as well. When opening the template via the shortcut, the init.py file isn’t run at startup. See a python example below. This is not an issue when using only the .blend files in a template.
Some Gotcha’s and some Python
Well… there are some gotcha’s to be aware of.
If you work with a custom template, but decide you want to change some of the preferences, or startup settings, the changed preferences of the template will become localized preferences.
This will also have Blender save the changed files in a new folder with the same name under the ‘config‘ folder. In our case ‘config/blenderbrew‘.
So if you don’t see your new template changes appear after a restart of Blender, this is the reason why.
This is easily fixed by moving the newly created .blend files back into the proper template folder, and remove the new folder under ‘config‘.
Now the new changes will show up after restarting with the template.
But hold on, what about Python…..?
There are some other things you can set with a custom template with the help of some python scripting.
Because some of the preference settings are global or app based, they don’t change while switching templates.
Examples are some of the Interface settings, or file paths. With a special python script called __init__.py we can force blender into changing some of these settings on template startup.
Python scripting is a bit outside the scope of this blog post, but we will discuss an example of a custom __init__.py file here:
#start init file

import bpy
from bpy.app.handlers import persistent

@persistent
def load_handler_for_preferences(_):
print("Changing Preference Defaults!")
from bpy import context

prefs = context.preferences
prefs.use_preferences_save = False

# changes some of the preferences>interface settings
view = prefs.view
view.ui_scale = 1.3
view.ui_line_width = 'THICK'
view.show_layout_ui = False
view.header_align = 'TOP'

#changes some of the prefeencres>Keymap settings
kc = context.window_manager.keyconfigs["blender"]
kc_prefs = kc.preferences
if kc_prefs is not None:
kc_prefs.select_mouse = 'LEFT'
kc_prefs.spacebar_action = 'TOOL'
kc_prefs.use_pie_click_drag = False

@persistent
def load_handler_for_startup(_):
print("Changing Startup Defaults!")

def register():
print("Registering to Change Defaults")
bpy.app.handlers.load_factory_preferences_post.append(load_handler_for_preferences)
bpy.app.handlers.load_factory_startup_post.append(load_handler_for_startup)

def unregister():
print("Unregistering to Change Defaults")
bpy.app.handlers.load_factory_preferences_post.remove(load_handler_for_preferences)
bpy.app.handlers.load_factory_startup_post.remove(load_handler_for_startup)

# end init file
The python file is executed when you use the custom template. Be aware that some settings might not revert back when loading another template, as they are global settings. You will have to create similar python files to ‘reset’ some of the more global values in the preferences when switching templates.
Distributing your custom template
Now that we have tweaked our files, and added more files to the template, we might want to give it away.
Like before, we can just zip up the final template folder with all the files into a zip file, and just distribute it.
So a basic template can just contain the startup and userpref blend files, or have the splash screens and python script added as well.
Download: The custom template discussed in this blog can be downloaded here. Hope it helps!
A big thanks for Erik Selin of artisticrender for getting us on the right track.
Note: At some point in time, we will start adding stuff to our YouTube channel as well. So keep an eye out on that one!